Excercise 2.1
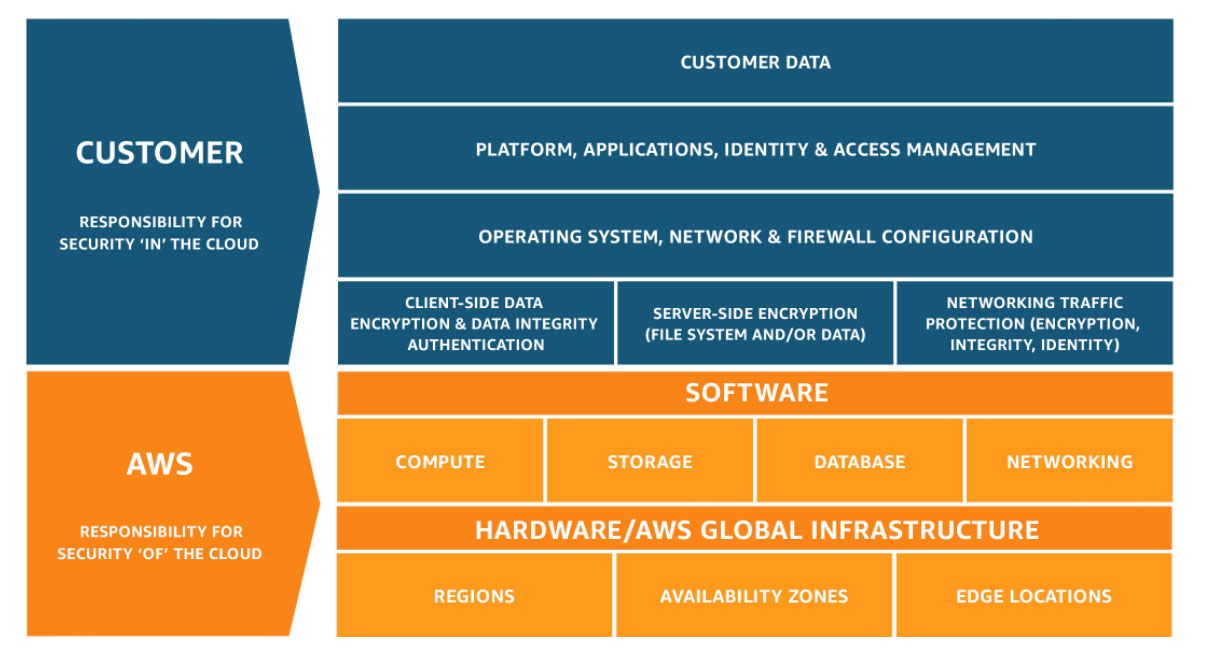
Shared Responsibility Model
Best Practices for Securing your aws account
AWS recommends several best practices for securing your AWS account:
- Require MFA for root-level access.
- Do not share root credentials with anyone other than the account holder.
- Physically secure root account hardware MFA devices in a safe place, such as a vault.
- Create individual IAM users.
- Use groups to assign permissions to IAM users.
- Enable MFA for privileged users.
- Use IAM roles for applications that run on Amazon EC2 instances.
- Delegate by using IAM roles instead of sharing credentials.
- Rotate credentials regularly.
- Remove unnecessary credentials.
- Use policy conditions for extra security.
- Monitor activity on your AWS account. Remove root credentials.
- Use access levels to review IAM permissions.
- Use AWS-defined policies to assign permissions whenever possible.
- Use IAM roles to provide cross-account access.
Creating user accounts and Groups
Create User
- Go to IAM and click add user
- Add a user, called John
- For access type, select both Programmatic access and AWS management console
- Click Next to add permission
- Click
add group, call itsystem-adminsand give it admin access Note: Access key id and secret access key are tokens that you use to programmically login to aws account using the command line tool. Keep in mind you can’t use these keys to login to AWS console and you can’t use use id and pass to access aws from command line.Create Group
- Lets now create a group called
HR - Attach a policy to allow HR user to only access S3 with READ ONLY ACCESS
- Type s3 and begin search.
AmazonS3ReadOnlyAccess - Add the newly created user to HR group
- Go to groups and permissions to validate the group permission
- We can also add permission to the user individually rather that adding it to the group.
- Under
Attach existing policies directlyselectAmazonGlacierReadOnlyAccess - Note that this permission is not from a group. So you an attach permission to both users and groups.
- Go to Users, John and click on
Security Credentialsto review the settings. Notice that you don’t see the secret access key any more. That is why you either download them or email them to the user. - By clicking
Mark inactive, you can disable the user account from accessing aws from command line.Create a Role
We want to create a role allwoing our EC2 instances acces to our S3 bucket.
- Under IAM, go to roles, click on
create role - Select
EC2and for the policy, selectAmazon S3 Full Access - Name the role
S3-Admin-Access - Once the role is created we can apply that role to the EC2 instance.
Next take a look at createing billing alarms
Install and Configure AWS CLI on Windows With MSI
Note: Root accout: Account created with the email when you signed up IAM User sign-in link: Can be customized to a different name
- Begin by logging in to the AWS Management Console with your user name, password, and MFA device (if applicable).
- Navigate to the IAM service.
- Select Security, and then click on your user name.
- Under Security Credentials, click Create Access Key.
- Before closing the dialog box that appears, save your access key and secret key in a safe place.
- Download the MSI Installer (https://s3.amazonaws.com/aws-cli/AWSCLI64.msi).
- Run the downloaded MSI installer.
- Follow the instructions that appear.
- Open a command prompt.
- Type
aws –version - Configure the AWS CLI by running the command
aws configureand filling in the access key and secret key that you obtained in Step 5. Optionally (but highly recommended), specify a default region, such as us-east-2. Also optionally, specify a default format type. - Test that you have set up the AWS CLI correctly and can connect to the AWS API endpoints by running the command
aws ec2 describe-availability-zones. The AWS CLI should return a list of the available Availability Zones in your default region.
On Linux or Mac
If Python isn’t installed on your system, install it using the directions at http://www.python.org/. If pip isn’t installed on your system, install it using the directions at https://pip.pypa.io/en/stable/installing/. Install the AWS CLI using the command pip install awscli --upgrade --user.
Set your profile
Linux, OS X Example:

$ export AWS_DEFAULT_PROFILE=account1
$ aws dynamodb list-tables
Windows Example:

$ set AWS_DEFAULT_PROFILE=account1
$ aws s3 ls
Create user account
aws iam create-user --user-name user1
- Assign password
- Add user to a group, if you don’t have a group created yet, create one called EC2-Admin group
- Login as the newly created user
Summary
IAM consists of the:
- Users
- Groups (a way to group user and apply policies to them collectivly)
- Roles
- Policy Documents (can be applied to users, groups, roles) Policy documents are universal and made up json, key value pair
{
    "Version": "2012-10-17",
    "Statement": [
        {
            "Effect": "Allow",
            "Action": "*",
            "Resource": "*"
        }
    ]
}
- IAM is universal and does not apply to regions at this time.
- Root account is created when you setup your aws account
- New users have no permissions when first created
- New users are assgined Access key and Secrect access key
- These are not the same as your user id and passwords
- Always setup MFA for your accounts
- Setup a password rotation policy for your account